
[[playlistSceneSlotProps.title]]
The easiest way to stream video on demand (VoD) is to use progressive HTTP streaming which doesn't require any additional or special web server configuration. DeoVR player will download video header and based on this information will send HTTP Range requests to the web server in order to download necessary parts of the video file.
HTTPS is required to ensure compatibility with all Android versions.
Just upload your video files to the public folder of your Web Server and if you encoded your video right it should work without any additional server configuration.
There are 2 downsides of this method:
There are quite a few different video and audio encodings available but not all of them you can use to play high-resolution VR video. All VR-ready PCs have hardware video decoding acceleration and it is a good idea to make use of it, more about it below. Set “Key Frame Distance” to 1-2 seconds, this will ensure good compromise between file size and smooth seeking.
There are simple rules you can follow to make sure that your customers will be able to watch your videos:
If you want to ensure that all your users will be able to watch your videos, you should provide several streaming options to them. The absolute minimum would be:
There is no cap on bitrate, but we recommend reading our article about how bitrate affects streaming video quality. When it comes to the quality of streaming VR video, 30Mbs is often enough in most cases.
DeoVR uses Rift_CV1 colors pace across all Oculus devices including Quest 2.
OpenXR specs say it is the preferred color space for standardised color across all Oculus HMDs:
Windows OS requires correct video codecs installed for DeoVR playback to work.
App player can work with any of these codecs:
Make sure to install at least one.
There are two ways to integrate DeoVR into the site.
A. Single video deeplink
A file .json with the description of one video is uploaded on the server. Then a button is added to the site. Once deeplink button is clicked, DeoVR launches and starts the video from this file. The video is played immediately.
B. Multiple videos selection
Called from DeoVR browser
Single .json file containing the list of videos is uploaded on the server. Then, in DeoVR “Internet browser” user calls the site (e.g. www.deovr.com) and gets access to the Selection Scene where they can choose a video from a list.
Called from a deeplink on the site
Single .json file containing the list of videos is uploaded on the server. Then a button with a deeplink to this file (e.g. “deovr://https://www.deovr.com/something.json”) is added to the site. By opening the site in a browser and clicking on the deeplink button, DeoVR launches and shows the user Selection Scene.
You can either implement just one integration, or both in the same time.
IMPORTANT!
DeoVR saves settings for videos internally, title will be the title of the video, but if you want to send multiple videos with same title—use ID to distinct between them.
"title": "ExampleVideo"
"id": 555
1. Resolutions
Create a list of "videoSources". Set the URL and resolution for each video source.
"videoSources":
[
    {
        "resolution": 1080,
        "url": "C:/JsonExampleVideos/ExampleVideo_1080p.mp4"
    },
    {
        "resolution": 1440,
        "url": "C:/JsonExampleVideos/ExampleVideo_1440p.mp4"
    }
]
2. Video preview
You can add a video file which will be used to show the rewind of the file in the player.
"videoThumbnail":"https://yoursite.com/ExampleVideo_SeekLookUp.mp4"The video should be in a low resolution as well as with low fps in order to save resources. In DeoVR for mobile devices this function may be unavailable.
3. Neccessary thumbnail and preview (optional) in case of playing from Selection Scene
In case of playing this video from the list, it is necessary to add the following lines:
"videoPreview":"https://yoursite.com/ExampleVideo_Preview.mp4"
"thumbnailUrl":"https://yoursite.com/ExampleVideo_Thumbnail.jpg"
The field ‘videoPreview’ contains the link to the video file, which is shown when moving the cursor to this video in the list. This field is not required.
The field ‘thumbnailUrl’ should contain the link to the file with the image shown in the list. This field is required in case of using the list.
4. Timestamps
Create a new list of "timeStamps". Each time stamp has time in seconds and a name value.
"timeStamps":
[
    {
        "ts": 15,
        "name": "Rabbit jumps"
    },
    {
        "ts": 30,
        "name": "Rabbit Sleeps"
    }
]
IMPORTANT!
For correct work of timeStamps you should also specify length of the video in seconds, otherwise unnecessary.
"videoLength": 605. Corrections
Declare "corrections" and set horizontal ("x") or vertical ("y") offset [min -7.5, max 7.5], brightness ("br"), contrast ("cont") or saturation ("sat") values [min -70, max 70].
"corrections":
    {
        "x": 5,
        "y": -5,
        "br": -10,
        "cont": 10,
        "sat": 20
    }
6. Other
"stereoMode" can be set to "sbs" for side by side stereoscopic layout, "tb" for top-bottom layout, "cuv" for custom UV layout (currently only used for Canon RF52 lens) or "off" for monoscopic videos.
"stereoMode": "tb"You can set type of the mesh in "screenType" field if video data json.
Use the following values to adjust it:
"screenType": "sphere"
7. Full JSON example
{
  "encodings":[
    {
      "name":"h264",
      "videoSources":[
        {
          "resolution":1080,
          "url":"https://yoursite.com/ExampleVideo_1080p.mp4"
        },
        {
          "resolution":1440,
          "url":"https://yoursite.com/ExampleVideo_1440p.mp4"
        },
        {
          "resolution":1920,
          "url":"https://yoursite.com/ExampleVideo_1920p.mp4"
        },
        {
          "resolution":2160,
          "url":"https://yoursite.com/ExampleVideo_2160p.mp4"
        },
        {
          "resolution":2880,
          "url":"https://yoursite.com/ExampleVideo_2880p.mp4"
        },
        {
          "resolution":3360,
          "url":"https://yoursite.com/ExampleVideo_3360p.mp4"
        },
        {
          "resolution":3840,
          "url":"https://yoursite.com/ExampleVideo_3840p.mp4"
        }
      ]
    }
  ],
  "title":"ExampleVideo",
  "id":123,
  "videoLength":60,
  "is3d":true,
  "screenType":"sphere",
  "stereoMode":"tb",
  "skipIntro":0,
  "videoThumbnail":"https://yoursite.com/ExampleVideo_SeekLookUp.mp4",
  "videoPreview":"https://yoursite.com/ExampleVideo_Preview.mp4",
  "thumbnailUrl":"https://yoursite.com/ExampleVideo_image.jpg",
  "timeStamps":[
    {
      "ts":15,
      "name":"Wall"
    },
    {
      "ts":30,
      "name":"Window"
    },
    {
      "ts":45,
      "name":"Door"
    }
  ],
  "corrections":{
    "x":5,
    "y":-5,
    "br":-10,
    "cont":10,
    "sat":20
  }
}
IMPORTANT!
“is3d” should always be true, in case of false video will be forced monoscopic.
Json file contains the a collection of single videos (see Single Video Deeplink). You can create multiple scenes which will be displayed as the tabs below the interface in Selection Scene.
Json file should contain at least one scene. Each scene corresponds with its own list of videos. An example of list of scenes format:
{
   "scenes":[
      {
         "name":"Trailers",
         "list":[
            … description of video as in single video deeplink …
         ]
      },
      {
         "name":"Full Videos",
         "list":[
            … description of video as in single video deeplink …
         ]
      }
   ],
   "authorized":"0"
}
In that case, two scenes named «Trailers» and «Full Videos» will be created.
An example of a full file with one scene and two videos:
{
  "scenes":[
    {
      "name":"Library",
      "list":[
        {
          "encodings":[
            {
              "name":"h264",
              "videoSources":[
                {
                  "resolution":1080,
                  "url":"https://yoursite.com/ExampleVideo_1080p.mp4"
                },
                {
                  "resolution":1440,
                  "url":"https://yoursite.com/ExampleVideo_1440p.mp4"
                }
              ]
            }
          ],
          "title":"ExampleVideo1",
          "screenType":"sphere",
          "stereoMode":"tb",
          "skipIntro":0,
          "videoThumbnail":"https://yoursite.com/ExampleVideo1_SeekLookUp.mp4",
          "videoPreview":"https://yoursite.com/ExampleVideo1_Preview.mp4",
          "thumbnailUrl":"https://yoursite.com/ExampleVideo1_image.jpg",
          "timeStamps":[
            {
              "ts":15,
              "name":"Wall"
            }
          ],
          "corrections":{
            "x":5,
            "y":-5,
            "br":-10,
            "cont":10,
            "sat":20
          },
          "is3d":true,
          "videoLength":60,
          "id":123
        },
        {
          "encodings":[
            {
              "name":"h264",
              "videoSources":[
                {
                  "resolution":1080,
                  "url":"https://yoursite.com/ExampleVideo2_1080p.mp4"
                },
                {
                  "resolution":1440,
                  "url":"https://yoursite.com/ExampleVideo2_1440p.mp4"
                }
              ]
            }
          ],
          "title":"ExampleVideo2",
          "screenType":"sphere",
          "stereoMode":"tb",
          "skipIntro":0,
          "videoThumbnail":"https://yoursite.com/ExampleVideo2_SeekLookUp.mp4",
          "videoPreview":"https://yoursite.com/ExampleVideo2_Preview.mp4",
          "thumbnailUrl":"https://yoursite.com/ExampleVideo2_image.jpg",
          "timeStamps":[
            {
              "ts":15,
              "name":"Wall"
            }
          ],
          "corrections":{
            "x":3,
            "y":-3,
            "br":-5,
            "cont":5,
            "sat":10
          },
          "is3d":true,
          "videoLength":65,
          "id":234
        }
      ]
    }
  ],
  "authorized":"0"
}
If the list of videos is too big, you can use shortened format.
In this case, instead of all fields required for the video to be played, only four fields are used with an addition of the field ‘video_url’, which contains Json to the full description of each video (see Single Video Deeplink).
The required fields of shortened format:
Example:
{
  "scenes":[
    {
      "name":"Library",
      "list":[
        {
          "title":"Play with a pretty dog",
          "videoLength":79,
          "thumbnailUrl":"https://deovr.com/s/images/feed/thumb1.png",
          "video_url":"https://deovr.com/deovr/video/id/1"
        },
        {
          "title":"Bikini car wash",
          "videoLength":242,
          "thumbnailUrl":"https://deovr.com/s/images/feed/thumb2.png",
          "video_url":"https://deovr.com/deovr/video/id/2"
        },
        {
          "title":"Date with a girl",
          "videoLength":401,
          "thumbnailUrl":"https:\/\/deovr.com\/s\/images\/feed\/thumb3.png",
          "video_url":"https://deovr.com/deovr/video/id/2"
        }
      ]
    }
  ]
}
Choosing of .json file name for DeoVR
If you want your site to be accessible from DeoVR Browser with the link as «http://www.yoursite.com», put file ‘deovr’ (without extension and quotes) into the root directory of the server.
When following a link containing only domain name, DeoVR will request the data at the address «http://www.yoursite.com/deovr».
In case calling any other URL, e.g. «http://www.yoursite.com/video/test» the request will be made at the same link without changes. The result of the server response should be a .json with a list of video description.
Authorization in DeoVR
In case of transferring login, the result of server response should also contain field “authorized” with the following values:
1 — user is successfully authorized;
0 — user without an account;
-1 — authorization error.
In case of authorization error, DeoVR shows the following message: «Invalid login or password!».
If authorization is not used, the field is not required or its value should equal to 0.
In case of authorization attempt, the current link with .json file (both the list and the video) will be opened through POST request method. Fields ‘login’ and ‘password’ will respective data entered by user. The result of the authorization should be reflected in the field ‘authorized’ of .json described earlier.
In case of using authorization, ‘login’ and ‘password’ will be transferred to the requests of obtaining scenes, as well as to the requests of video description.
To provide user a feed of images (instead of videos), you must pass an image path (link to the image) in to the "path" variable instead of encoding classes. For StereoMode, ScreenType you can set screenType and stereoMode parameters or specify flags directly in the image file names.
Example:
{
  "scenes":[
    {
      "name":"Library",
      "list":[
        {
          "path":"https://yoursite.com/picture1_tb_360.jpg",
          "title":"ExamplePicture1",
          "screenType":"sphere",
          "stereoMode":"tb",
          "thumbnailUrl":"https://yoursite.com/thumbnail_picture1.jpg",
          "corrections":{
            "x":5,
            "y":-5,
            "br":-10,
            "cont":10,
            "sat":20
          },
          "is3d":true,
          "id":123
        },
        {
          "path":"https://yoursite.com/picture2_sbs_360.jpg",
          "title":"ExamplePicture2",
          "screenType":"sphere",
          "stereoMode":"sbs",
          "thumbnailUrl":"https://yoursite.com/thumbnail_picture2.jpg",
          "is3d":true,
          "videoLength":65,
          "id":234
        }
      ]
    }
  ],
  "authorized":"0"
}This guide will demonstrate you how remote control works. You can find a simple remote control client app with a source code here:
https://deovr.com/s/DeoRemoteControlTest.zip
The client is written in C# Windows Forms.
Preparing DeoVR:
Preparing Remote Control Client
Source code of this app is written in C# and is free to use. RemoteControlClient. cs could be used for comunication in separate program. It implements Connect, Disconnect and Send methods and OnConnected, OnDisconnected and OnDataReceived events. OnDataReceived would be executed each 1 second, when you are in the video player. OnDataReceived and Send works with RemoteApiData class which could be filled and sent or received back from DeoVR. You can check button handlers in TestForm. cs to see how to fills RemoteApiData.
Raw DeoVR remote control protocol description
Remote control client should connect to the device with running DeoVR on TCP port 23554.After the connection has been established, DeoVR will start sending a packet each one second. Remote client also must send a packet (empty or with json) to DeoVR each one secondfor pinging purposes.
Packet structure:
Here's a structure of encoded json:
{
    "path":"D:/test.mp3",
    "duration":123.45,
    "currentTime":10.5,
    "playbackSpeed":1.0,
    "playerState":0
}
PlayerState is enumerator: Play = 0, Pause = 1. You can send packet with path, currentTime and playbackSpeed fields. DeoVR will automatically open new file/path, seek to special time or change playback speed. The only one condition, that you have to be inside video player in DeoVR.
DeoVR adds support for a spatial audio. Final VR video should be provided in .mkv container, with audio encoded in Opus codec. Only tbe8_2 format is supported at the moment. To learn more about creating spatial audio proceed to Spatial Workstation website. Select FB360 Matroshka (experimental) when exporting from Spatial Workstation.
To enable support of spatial audio on your website via DeoVR deeplink scheme add a separate “encodings_spatial” field in your JSON with encodings. Similar to “encodings” specify all other information but instead point to your .mkv files only with the spatial track.
Important: regular stereo track should be excluded from the file.
If you are playing a file with Path and not Encodings, the file should have the flag “-FB360” or “_FB360”.
As of April 2021 switching between audio track manually is not yet supported.
Important when uploading video files with Spatial Audio.
The master file must be provided in the format: MP4 or MKV and contain a stereo track with two channels.
If you need to support Spatial Audio, the master file must be in MKV format and contain two tracks.
Track 1 should contain a track with Spatial Audio in Facebook 360 TBE 8.2 format.
Track 2 must be present and in 2-channel stereo format.
Example:
{
  "scenes":[
    {
      "name":"Library",
      "list":[
        {
          "encodings":[
            {
              "name":"h264",
              "videoSources":[
                {
                  "resolution":1080,
                  "url":"https://yoursite.com/ExampleVideo_1080p.mp4"
                },
                {
                  "resolution":1440,
                  "url":"https://yoursite.com/ExampleVideo_1440p.mp4"
                }
              ]
            }
          "encodings_spatial":[
            {
              "name":"h264",
              "videoSources":[
                {
                  "resolution":1080,
                  "url":"https://yoursite.com/SpatialExampleVideo_1080p.mkv"
                },
                {
                  "resolution":1440,
                  "url":"https://yoursite.com/SpatialExampleVideo_1440p.mkv"
                }
              ]
            }
          ],
          "title":"ExampleVideo1_Spatial",
          "screenType":"sphere",
          "stereoMode":"tb",
          "skipIntro":0,
          "videoThumbnail":"https://yoursite.com/ExampleVideo1_SeekLookUp.mp4",
          "videoPreview":"https://yoursite.com/ExampleVideo1_Preview.mp4",
          "thumbnailUrl":"https://yoursite.com/ExampleVideo1_image.jpg",
          "timeStamps":[
            {
              "ts":15,
              "name":"Wall"
            }
          ],
          "is3d":true,
          "videoLength":60,
          "id":123
        }
  ],
  "authorized":"0"
}DeoVR supports the following projection styles (meshes):
Eye location:
To play local files in the correct mode or add the appropriate flag from the following list to the file name:
For Stereo mode (equirectangular):
\\Canon VR lens\\Canon VR lensTo switch Screen Type:
For example:
Title_SBS_180.mp4 sets Side by Side & 180°
My_video_SBS_mkx200.mp4 sets Side by Side & 200°
Title_FB360_SBS_180.mkv sets Side by Side & 180 & Spatial soundYou can stream from the Zcam K2 Pro camera to Quest headsets with the help of Raspberry Pi. This brings the director's monitor view right into VR and you can adjust the scene before you press the record button. You might try recording and streaming at the same time.
Make sure to mount the Raspberry Pi SD image from the description to this video before you start. Use the original charger or appropriate power bank for the Raspberry Pi. Make sure to keep your Raspberry Pi away from routers or other WiFi devices.
Streaming works from a master camera, which shows footage in mono at 5Mbps with approximately 10 seconds latency. The master camera or camera A is the one with a screen and the record button.
Make sure you have DeoVR installed on your Quest headset.
This is RTSP streaming, the only option of K2 camera.
RTSP support is only available on the Windows platform.
RTMP not supported.
HLS supported.
If you want to open you own HLS stream in DeoVR, simply enter HLS stream url into DeoVR.
Or you can make json file named "deovr" with an entry to HLS stream. You can use this file to provide easy access to multiple HLS streams from DeoVR dashboard.
You can get more information about deovr json file in the article 5.
{
    "scenes": [
        {
            "name": "VR180 Samples",
            "list": [
                {
                    "path": "https://yoursite.com/Example.m3u8",
                    "title": " ExampleStream",
                    "screenType": " sphere",
                    "stereoMode": "sbs",
                    "thumbnailUrl": "https://yoursite.com/ExampleTumb.jpg",
                    "is3d": true,
                    "id": "01"
                }
            ]
        }
    ],
    "authorized": "0"
}
Anaglyph mode is a tool for VR creators that shows how one picture will be seen relative to another. It will greatly speed up the alignment process when creating a quick preview of your VR footage before you stitch together your video. It’s essential that the furthest point matches and that images are on the same horizontal line.
To use this tool, install this build on top of the DeoVR app.
Passthrough is a way to blend the real and virtual worlds using DeoVR. It can also be described as mixed reality or Augmented Reality (AR). It uses the passthrough/AR function on virtual reality headsets to bring VR content into the user’s real-world surroundings. A VR headset with a front-facing camera is required, such as the Quest 3 or Valve Index.
Viewing Passthrough content with DeoVR:
Uploading Passthrough content to DeoVR:
Early passthrough only allowed cutting one color, such as black, green, or white. Black colour was set by default, and if the user wanted to change the colour, they would use settings such as hue, saturation, brightness, colour range and falloff (feather).
Creators can add specific passthrough parameters to their videos when uploading content (or at a later date). This page is a new addition to the DeoVR Creator's panel. [Feb 2024]
Add the accurate values for each setting: Hue, Saturation, Brightness, Color Range, Falloff, or leave at the default settings for green screen. (If you're using Alpha Channel passthrough you can also select that on this page.)
Legacy:
Previously, if the user wants to upload Passthrough content using a specific color background, they could submit those settings in the description of the video, and then the DeoVR moderators would use those settings as the default for that video:
#passthrough settings#
Hue 30
Saturation 100
Brightness 100
Color Range 360
Falloff 1000
Or, more simply:
#passthrough settings#
30
100
100
360
1000
To discover the correct settings, the creator will first need to identify them offline (by uploading video to his headset and testing locally using the DeoVR app).
Step-by-step tutorial:
In this example, we will use a video with a black background.


To create a video with a black background, you can use a completely black color (see below), which is set as the default for black background passthrough settings:

If you work in Adobe After Effects, or any other software that supports color hex/color picker, use these numbers in the color picker : #000000
This method may cause artifacts on the edges of an object, depending on the video quality and lighting conditions.
In this example, you can see that the shoes are affected and partly transparent because the shoes are black:

This is why green or blue colors are recommended for passthrough videos.
Green background
If your video features a green background, these are the settings you can use to make it transparent:

DeoVR uses the default green background color that most creators use for passthrough. Use this image below for color-picking the proper green background, or use the following hex code inside of the color picker #2BE640

You will see this method is much cleaner and creates fewer artifacts. However, it is not perfect. To discover the best values, use the same logic as described above with the black background, and include them in the description section when uploading to DeoVR.
The most recent and advanced version of passthrough is called alpha passthrough and requires creating an embedded alpha channel inside of the video.
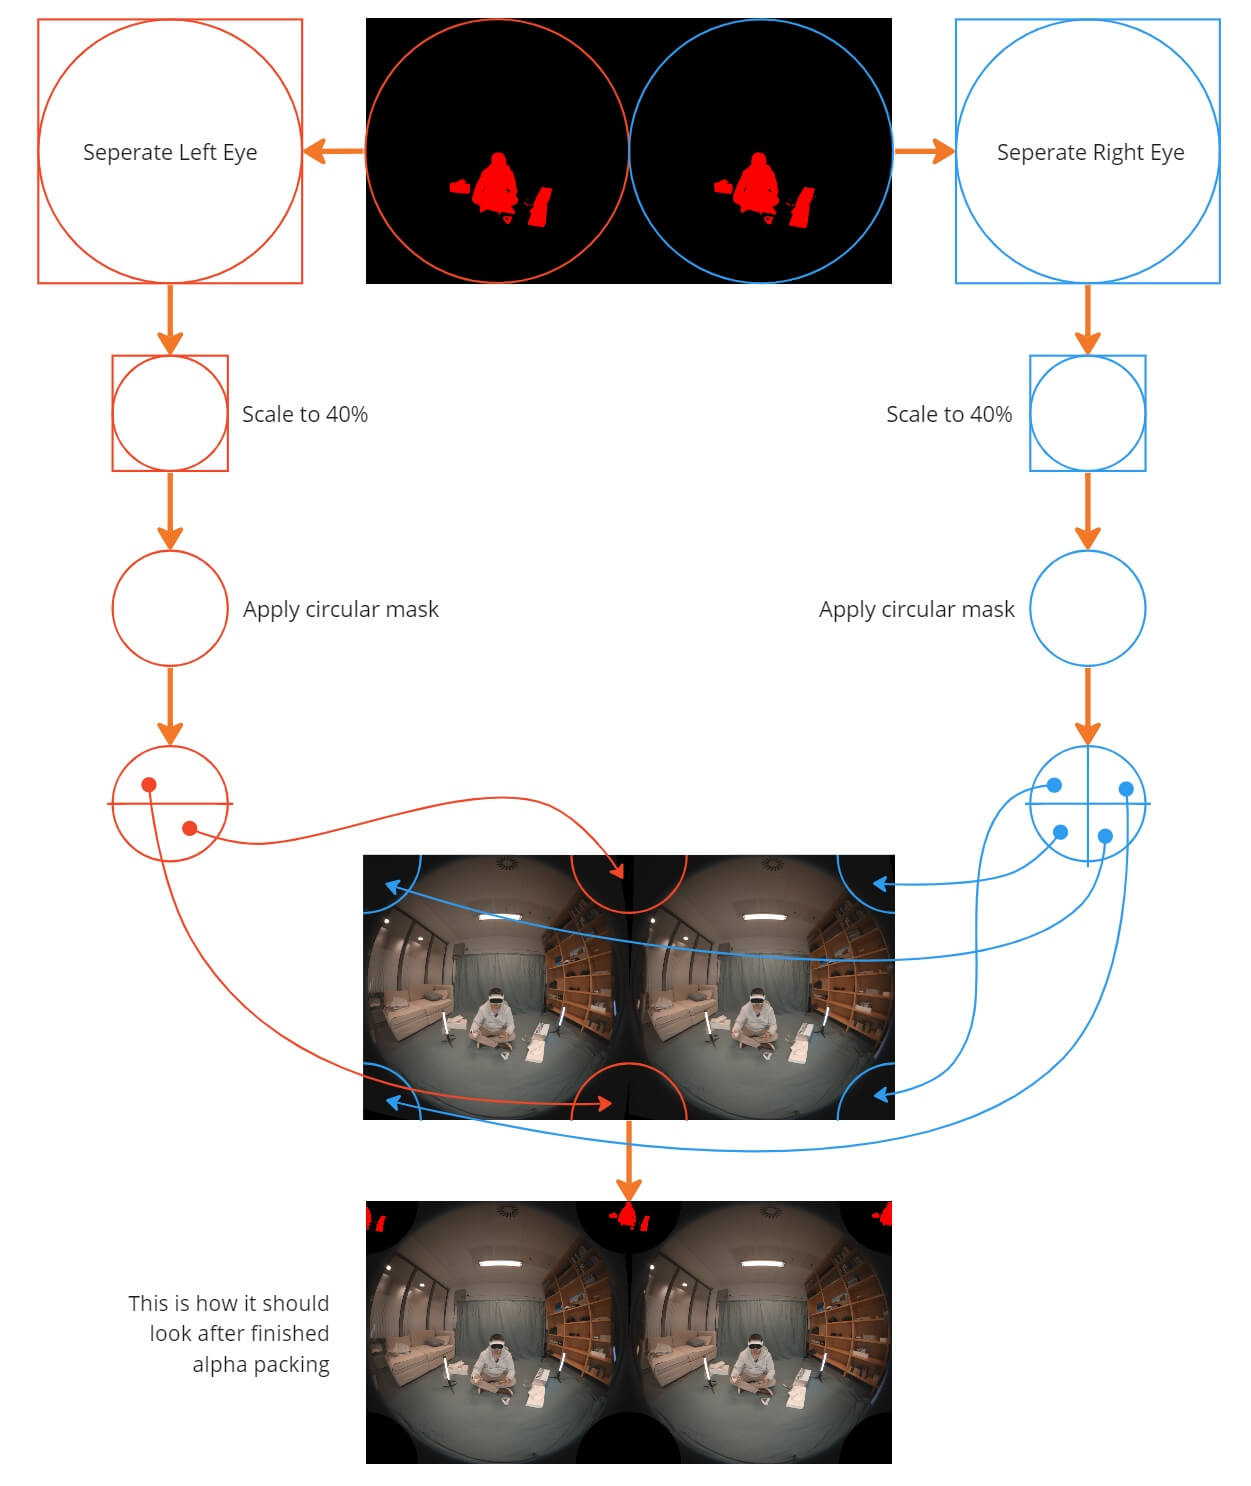
It's a more complex method but allows better control of the quality and doesn't require any settings for preview. Simply click a button to switch between passthrough and non-passthrough. Currently, it only works only with fisheye projection VR video as it packs the alpha channel next to fisheye circles.
Benefits:
Guide to creating the correct layout:
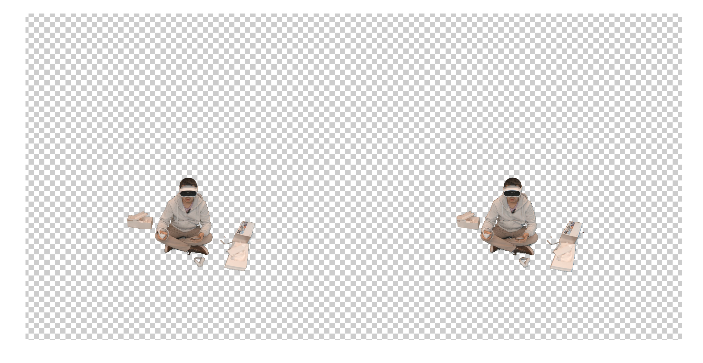
In your compositing software, export a normal video where you suppress the green color, and another version with just alpha as black and white (later, we will use only the red channel) at the same size and length as the normal video.
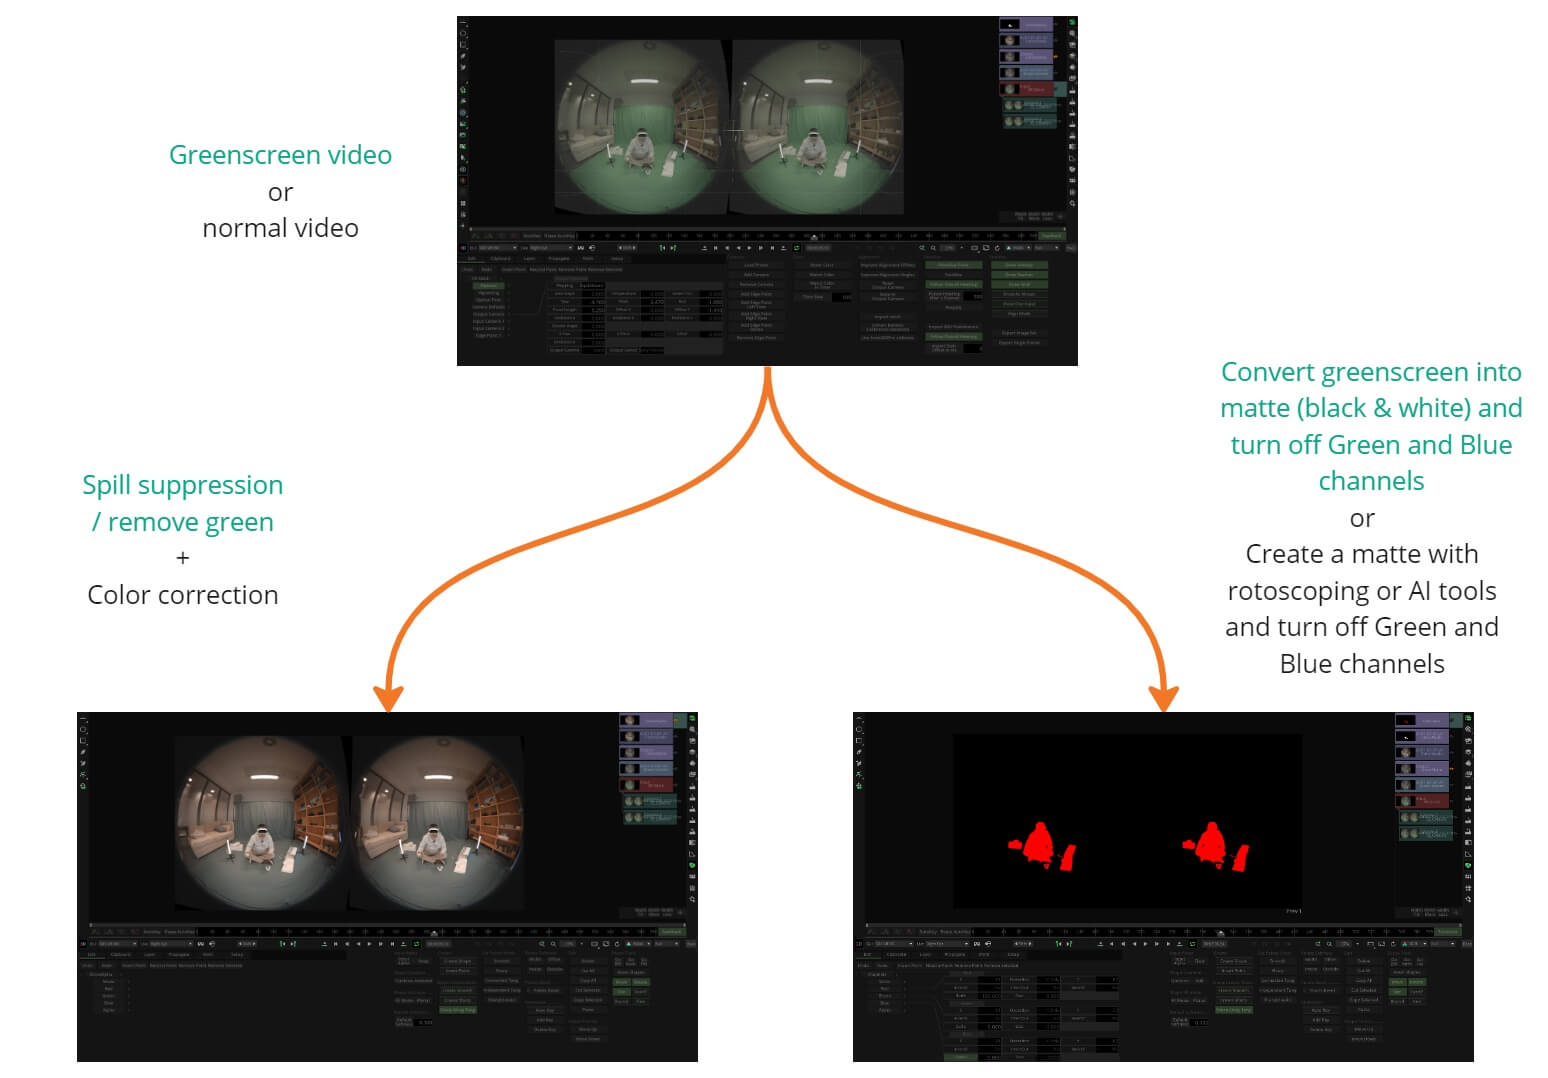
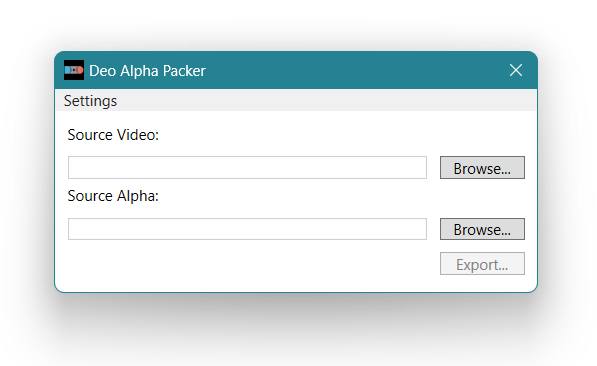
Alternatively, pack it yourself in a compositing software following this diagram:
The final step is to add _ALPHA into the file name before uploading, or tell the uploader to switch the "Has Alpha" option ON.
Done! Now, the DeoVR player will show the video with perfect passthrough.
If you're using Adobe Premiere to edit together your VR content, use these project preset files to create alpha channel content for passthrough. This .rar file contains two masks, a sample video and a tutorial.
Similarly, if you're using Adobe After Effects to create VR content, use these project preset files to create alpha channel content for passthrough. This .rar file contains the project file, a sample video and a tutorial.
DeoVR offers state-of-the-art subtitles support, with the ability to position, scale, set BG opacity and place them at any depth.
Support:
How to set up:
The DeoVR player supports most common video and audio file formats and codecs available today when playing local files, with small differences between the Windows and Android/standalone headset (Quest/Pico) apps.
DeoVR Windows app: AVI, MPEG, MP4, MOV, MPG, M4V, JPG, PNG, M3U8
Quest/Pico app: MPEG, MP4, MKV, WebM, MPG, M4V, JPG, PNG, M3U8
DeoVR Windows app: HEVC/H.265, H.264, H.263 (DivX/XVid), MJPEG, WMV, Hap, NotchLC, DV
Quest/Pico app: HEVC/H.265, H.264, H.263 (DivX/XVid), VP8, VP9, DV, Uncompressed R10K, Uncompressed V210, Uncompressed 2VUY
DeoVR Windows app: MP3, AAC, WAV, FLAC, OPUS, µLAW, ADPCM, Linear PCM
Quest/Pico app: MP3, AAC, WAV, FLAC, OPUS, Linear PCM
Use this link to download the apk file.
You can also use SideQuest to install DeoVR on your headset for your Quest 2, 3, or Pro, for Pico 3, 4